This page will guide you through steps to setup high availability Magnolia CMS follow our previous how to article Guide - How to install your perfect linux server for Magnolia and Guide - How to configure an apache load balancer using another technology (HAProxy and memcached session management - msm) to provide pretty much the same functionalities on Ubuntu 16.04 or above operating system versions.
Concepts

-- https://assets.digitalocean.com/articles/high_availability/ha-diagram-animated.gif
HAProxy terminology
First of all, as we start working with HAProxy and incase you are new to it there are some specific concepts that could help you easier catch up with what we are doing provided by Mitchell Anicas on his Digital Ocean introduction to haproxy and loadbalancing concepts. You can skip this section and move on to Overview section if you already familiar with all of this and related concepts.
There are many terms and concepts that are important when discussing load balancing and proxying. We will go over commonly used terms in the following sub-sections.
Before we get into the basic types of load balancing, we will talk about ACLs, backends, and frontends.
Access Control List (ACL)
In relation to load balancing, ACLs are used to test some condition and perform an action (e.g. select a server, or block a request) based on the test result. Use of ACLs allows flexible network traffic forwarding based on a variety of factors like pattern-matching and the number of connections to a backend, for example.
Example of an ACL:
acl url_blog path_beg /blog
This ACL is matched if the path of a user's request begins with /blog. This would match a request of http://yourdomain.com/blog/blog-entry-1, for example.
For a detailed guide on ACL usage, check out the HAProxy Configuration Manual.
Backend
A backend is a set of servers that receives forwarded requests. Backends are defined in the backendsection of the HAProxy configuration. In its most basic form, a backend can be defined by:
- which load balance algorithm to use
- a list of servers and ports
A backend can contain one or many servers in it--generally speaking, adding more servers to your backend will increase your potential load capacity by spreading the load over multiple servers. Increase reliability is also achieved through this manner, in case some of your backend servers become unavailable.
Here is an example of a two backend configuration, web-backend and blog-backend with two web servers in each, listening on port 80:
backend web-backend
   balance roundrobin
   server web1 web1.yourdomain.com:80 check
   server web2 web2.yourdomain.com:80 check

backend blog-backend
   balance roundrobin
   mode http
   server blog1 blog1.yourdomain.com:80 check
   server blog1 blog1.yourdomain.com:80 check
balance roundrobin line specifies the load balancing algorithm, which is detailed in the Load Balancing Algorithms section.
mode http specifies that layer 7 proxying will be used, which is explained in Types of Load Balancingsection.
The check option at the end of the server directives specifies that health checks should be performed on those backend servers.
Frontend
A frontend defines how requests should be forwarded to backends. Frontends are defined in the frontendsection of the HAProxy configuration. Their definitions are composed of the following components:
- a set of IP addresses and a port (e.g. 10.1.1.7:80, *:443, etc.)
- ACLs
- use_backend rules, which define which backends to use depending on which ACL conditions are matched, and/or a default_backend rule that handles every other case
A frontend can be configured to various types of network traffic, as explained in the next section.
Types of Load Balancing
Now that we have an understanding of the basic components that are used in load balancing, let's get into the basic types of load balancing.
No Load Balancing
A simple web application environment with no load balancing might look like the following:
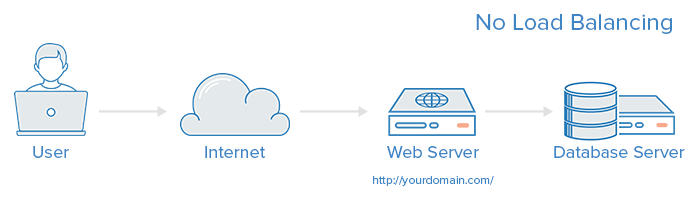
In this example, the user connects directly to your web server, at yourdomain.com and there is no load balancing. If your single web server goes down, the user will no longer be able to access your web server. Additionally, if many users are trying to access your server simultaneously and it is unable to handle the load, they may have a slow experience or they may not be able to connect at all.
Layer 4 Load Balancing
The simplest way to load balance network traffic to multiple servers is to use layer 4 (transport layer) load balancing. Load balancing this way will forward user traffic based on IP range and port (i.e. if a request comes in for http://yourdomain.com/anything, the traffic will be forwarded to the backend that handles all the requests for yourdomain.com on port 80). For more details on layer 4, check out the TCP subsection of our Introduction to Networking.
Here is a diagram of a simple example of layer 4 load balancing:
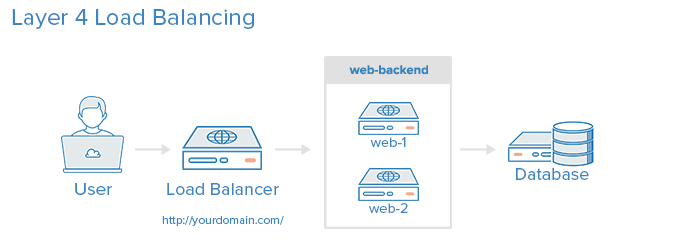
The user accesses the load balancer, which forwards the user's request to the web-backend group of backend servers. Whichever backend server is selected will respond directly to the user's request. Generally, all of the servers in the web-backend should be serving identical content--otherwise the user might receive inconsistent content. Note that both web servers connect to the same database server.
Layer 7 Load Balancing
Another, more complex way to load balance network traffic is to use layer 7 (application layer) load balancing. Using layer 7 allows the load balancer to forward requests to different backend servers based on the content of the user's request. This mode of load balancing allows you to run multiple web application servers under the same domain and port. For more details on layer 7, check out the HTTPsubsection of our Introduction to Networking.
Here is a diagram of a simple example of layer 7 load balancing:
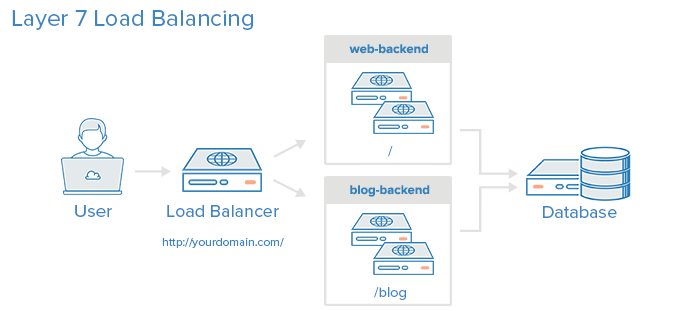
In this example, if a user requests yourdomain.com/blog, they are forwarded to the blog backend, which is a set of servers that run a blog application. Other requests are forwarded to web-backend, which might be running another application. Both backends use the same database server, in this example.
A snippet of the example frontend configuration would look like this:
frontend http
  bind *:80
  mode http

  acl url_blog path_beg /blog
  use_backend blog-backend if url_blog

  default_backend web-backend
This configures a frontend named http, which handles all incoming traffic on port 80.
acl url_blog path_beg /blog matches a request if the path of the user's request begins with /blog.
use_backend blog-backend if url_blog uses the ACL to proxy the traffic to blog-backend.
default_backend web-backend specifies that all other traffic will be forwarded to web-backend.
Load Balancing Algorithms
The load balancing algorithm that is used determines which server, in a backend, will be selected when load balancing. HAProxy offers several options for algorithms. In addition to the load balancing algorithm, servers can be assigned a weight parameter to manipulate how frequently the server is selected, compared to other servers.
Because HAProxy provides so many load balancing algorithms, we will only describe a few of them here. See the HAProxy Configuration Manual for a complete list of algorithms.
A few of the commonly used algorithms are as follows:
roundrobin
Round Robin selects servers in turns. This is the default algorithm.
leastconn
Selects the server with the least number of connections--it is recommended for longer sessions. Servers in the same backend are also rotated in a round-robin fashion.
source
This selects which server to use based on a hash of the source IP i.e. your user's IP address. This is one method to ensure that a user will connect to the same server.
Sticky Sessions
Some applications require that a user continues to connect to the same backend server. This persistence is achieved through sticky sessions, using the appsession parameter in the backend that requires it.
Health Check
HAProxy uses health checks to determine if a backend server is available to process requests. This avoids having to manually remove a server from the backend if it becomes unavailable. The default health check is to try to establish a TCP connection to the server i.e. it checks if the backend server is listening on the configured IP address and port.
If a server fails a health check, and therefore is unable to serve requests, it is automatically disabled in the backend i.e. traffic will not be forwarded to it until it becomes healthy again. If all servers in a backend fail, the service will become unavailable until at least one of those backend servers becomes healthy again.
For certain types of backends, like database servers in certain situations, the default health check is insufficient to determine whether a server is still healthy.
Load-balancing and Sticky-sessions
Then if you are new to Load-balancing and Sticky sessions, please reference to below excerpt which I extracted from Ricky's Hodgepodge Blogspot for your information.
Load Balancing + Stickyness
The first and more easy clustered solution is just a setup with two or more applications servers which receive clients in a sticky way. When I say stickyness I refer to the fact that when a user request has first sent towards a specified server (and the java session has been created in this server) the load balancing element always sends his future requests to the same server. This way the session is maintained in only one server but everything works as expected.
In this scenario there is no special session treatment and, therefore, if one application server dies all its sessions (clients) are lost. The balancer will detect the server has fallen and all new requests will be redirected against another server but, as sessions are stored individually, the user will have to re-login and previous work (in a shopping cart application for instance) could be lost.
As you see this solution is very very simple. There are lots of load balancers solutions (software or hardware) and almost all of them support stickyness (using jsessionid tracking cookie) and server status checks. Stickyness can also be used in the other two solutions and, in fact, it is usually recommended.
Load Balancing + Session Replication
The second solution tries to solve the session lost problem of the previous scenario. Many application servers (all famous ones at least) implement a in-memory session replication. This way when a request modifies any attribute in the session these changes are sent to the rest of servers and, consequently, session is always up to date in all of them.
This solution solves the main problem but it is not absolutely safe. Some problems are the following: all sessions are in all serves (this is the main one, think about a ten server cluster with thousands and thousands of sessions), replication is not immediately done, performance drops when a lot of sessions are involved or they are very big and, if all servers die unexpectedly, they are also lost.
Load Balancing + HA Storage
The final solution is to use another persistent element to store sessions (Application Server can save sessions only in the repository or in both sites, its own heap and in the new repository). This solution has two main problems, the High Availability feature is moved from Application Servers to the external repository and the performance penalty of storing and retrieving any session may be major.
Session replication themes
Moreover there are several themes of Session replication from Thomas Andraschko Blogspot that you probably want to reference with some nice pictures and pros/cons analysis below.
All to all replication / DeltaManager
With this mode, Tomcat just replicates the session to all registered nodes.
Pro:
- No single point of failure at software level
- Every node holds all sessions
- In theory, all other nodes can be turned off
- No extra software is needed
- Synchronous or Asynchronous replication
- Open Source
- Enterprise-Support available
Contra:
- High memory usage and network traffic because all nodes holds all sessions
- Objects which are stored in the session must be triggered manually to replicate again if a property has been changed
- Slower session serialization
Primary/Secondary Replication (Buddy Replication) / BackupManager
The sessions will be replicated to the next neighbor. If one Tomcat is not available anymore, the neighbor still holds the sessions.
Pro:
- No single point of failure at software level
- Lower memory usage and network traffic because the session is not stored on all nodes
- No extra software is needed
- Synchronous or Asynchronous replication
- Open Source
- Enterprise-Support available
Contra:
- Not quite as battle tested as the All-to-all replication (see Tomcat documentation)
- Objects which are stored in the session must be triggered manually to replicate again if a property has been change
- Slower session serialization
Memcached-session-manager
Each Tomcat replicates all sessions to N (multiple) Memcached nodes.
If a session is not available on the local Tomcat, the memcached-session-manager tries to lookup the session from the Memcached nodes.
Pro:
- No single point of failure at software level
- More scalability
- Session will be replicated to N “Memcached” nodes – The sessions are still available if all webservers are down
- Automatically handles “Memcached” nodes failover
- Sticky mode: Lower memory usage because every node holds only the current used sessions
- Non-Sticky mode: Lowest memory usage because Tomcat does not hold the sessions anymore. Session will be received from memcached for each request
- MSM will automatically trigger replication if a property in a session stored object has been changed
- Faster session serialization – Changeable mechanism
- Synchronous or Asynchronous replication
- Open Source
- Enterprise-Support available for Tomcat
Contra:
- Extra software needed (“Memcached” plugin and nodes)
- Cannot switch to another Java Webserver which does not automatically check changed values in the session - but only if the used framework has no implemented workaround
- AFAIK no Enterprise-Support available for the Memcached plugin but Martin Grotzke is very active on the mailing list
High-availability clustered infrastructure
| After this guide, you could also go further to configure a high-availability clustered infrastructure (HACI) with fail-safe load-balancer in Clustering Tomcat Servers with High Availability and Disaster Fallback published by Lieven Doclo on Java Dronze which looks like this one: |

Apache Ignite web session clustering
Finally you might want to do a web session clustering, please referenece to Apache Ignite project to figure out how to integrate it to your existing system instead of using msm - memcached session management library. A short cross reference from Apache Ignite Web Session Clustering:
Ignite In-Memory Data Fabric is capable of caching web sessions of all Java Servlet containers that follow Java Servlet 3.0 Specification, including Apache Tomcat, Eclipse Jetty, Oracle WebLogic, and others. Web sessions caching becomes useful when running a cluster of app servers. When running a web application in a servlet container, you may face performance and scalability problems. A single app server is usually not able to handle large volumes of traffic by itself. A common solution is to scale your web application across multiple clustered instances |

So shall we start!
Overview
We will simulate above architecture using 2 Debian based instances, one will not only acts as a load balancer but also as an application server node 1. The other one (node 2) will barely a tomcat instance which quite similar to the first one. Also in this guide we will setup HAProxy layer 7 load balancing (application layer) and memcached sticky sessions using kryo library (reference here).
Note that during this session, I'm using haproxy_www_public_IP:8888 or 192.168.56.108:8888 as our public HAProxy instance, 192.168.56.108:8080 as server-tomcat1:port, 192,168.56.109:8080 as server-tomcat2:port interchangnably, please replace them with your suitable IP addresses. They will occationally appeared in some sample output or checkpoint verification images for your reference. Thank you!
Prerequisite
Note that please have JAVA 8 and Apache Tomcat app server available in your instances before we go on, for short I'll skip these basic steps and go on with some notices:
JAVA 8
Your JAVA_HOME might look like this:
JAVA_HOME="/usr/lib/jvm/java-8-oracle"
Apache Tomcat
And your CATALINA_HOME might be configured as below:
CATALINA_HOME="/opt/tomcat"
Remember to adjust your firewall so that traffics can go through Tomcat port 8080:
$ sudo ufw allow 8080
For Tomcat automatically startup, use this:
$ sudo systemctl enable tomcat
To enable Tomcat administrator login, add this line above your end tag of </tomcat-users> in your $CATALINA_HOME/conf/tomcat-users.xml (feel free to use your prefered name and password)
<user username="admin" password="password" roles="manager-gui,admin-gui"/>
PsiProbe
Deploy a correct PSI Probe version for sessions management and control (for example I'm using Tomcat 8.5 which required Probe v3.x or above). Download here https://github.com/psi-probe/psi-probe/releases
PSI Probe is a community-driven fork of Lambda Probe distributed under the same open-source license (GPLv2). It is intended to replace and extend Tomcat Manager, making it easier to manage and monitor an instance of Apache Tomcat.
Checkpoint
Please make sure that Probe web-app is accessible from outside of our local network to any instance including our HAProxy address as below image before we move on.
You can use this link: http://haproxy_www_public_IP:8888/probe/ or any of http://tomcat-server-IP:8080/probe/

Memcached installation and configuration
Memcached is nicely publicly available to us, just deliver this command to install:
$ apt install memcached
Configure memcached for external referencing
By default memcached is listening on port 11211 and its configuration file is under '/etc/memcached.conf', you will need to modify its '-l' startup option using your instance IP address and open your instances firewall on this port accessing from outside. Here is how it looks like:
# Specify which IP address to listen on. The default is to listen on all IP addresses
# This parameter is one of the only security measures that memcached has, so make sure
# it's listening on a firewalled interface.
-l 192.168.56.109
And here is how to open your firewall on port 11211
$ sudo ufw allow 11211
Restart memcached service and check its status as below:
$ sudo service memcached restart
$ sudo service memcached status
Output:
Checkpoint
Go to any public manchine (outside your local network) and use this command to verify memcached service is up and running on both instances:
$ echo "stats settings" | nc tomcat-instance-1-IP 11211
Output:
HAProxy
You can reference here for more information https://www.digitalocean.com/community/tutorials/how-to-use-haproxy-as-a-layer-7-load-balancer-for-wordpress-and-nginx-on-ubuntu-14-04
Install haproxy
$ sudo apt install haproxyWe need to enable the HAProxy init script, so HAProxy will start and stop along with your VPS.
$ sudo vi /etc/default/haproxy
Change the value of ENABLED to 1 to enable the HAProxy init script:
ENABLED=1Configure haproxy
First, let's make a copy of the default haproxy.cfg file:
$ sudo cp /etc/haproxy/haproxy.cfg /etc/haproxy/haproxy.cfg.origNow open haproxy.cfg in a text editor:
$ sudo vi /etc/haproxy/haproxy.cfg
You will see that there are two sections already defined: global and defaults. First we will take a look at some of the default parameters.
Under defaults, look for the following lines:
mode    http
option  httplog
Selecting http as the mode configures HAProxy to perform layer 7, or application layer, load balancing. This means that the load balancer will look at the content of the http requests and forward it to the appropriate server based on the rules defined in the frontend.
Frontend Configuration
The first thing we want to add is a frontend. For a basic layer 7 reverse proxying and load balancing setup, we will want to define an ACL that will be used to direct our traffic to the appropriate backend servers.
At the end of the file, let's add our frontend, www. Be sure to replace haproxy_www_public_IP with the public IP of your haproxy-www VPS, also note that I'm using port 8888 for demo session:
frontend www
	bind haproxy_www_public_IP:8888
	option http-server-close
	# acl url_mgnlha path_beg /mgnlha
	# use_backend mgnlha-backend if url_mgnlha
	default_backend web-backend
Backend Configuration
After you are finished configuring the frontend, continue adding your first backend by adding the following lines. Be sure to replace the highlighted words with the appropriate values:
backend web-backend
   server tomcat1 192.168.56.108:8080 cookie n1 check
   server tomcat2 192.168.56.109:8080 cookie n2 check
   appsession JSESSIONID len 52 timeout 90s request-learn prefix
   #HAProxy version 1.6.3 will need this for sticky session, rem above line
   cookie JSESSIONID prefix nocache
HAProxy Stats
If you want to enable HAProxy stats, which can be useful in determining how HAProxy is handling incoming traffic, you will want to add the following into your configuration:
listen stats
   bind  :1936
   stats enable
   stats scope www
   stats scope web-backend
   # stats scope mgnl-backend
   stats uri /stats
   stats realm Haproxy\ Statistics
   stats auth user:password
   stats refresh 30s
   stats show-node
Enabling HAProxy Logging
Enabling logging in HAProxy is very simple. First edit the rsyslog.conf file:
sudo vi /etc/rsyslog.conf
Then find the following two lines, and uncomment them to enable UDP syslog reception. It should look like the following when you are done:
$ModLoad imudp$UDPServerRun 514$UDPServerAddress 127.0.0.1
Now restart rsyslog to enable the new configuration:
$ sudo service rsyslog restart
HAProxy logging is is now enabled! The log file will be created at /var/log/haproxy.log once HAProxy is started.
Restart haproxy service
$ sudo service haproxy restart
$ sudo service haproxy status
Output:
Checkpoint
Validate HAProxy Stats from external computer by going to your haproxy_www_public_IP port 1936 and context path 'stats' (as configured above) and verify that it is looking like this:

MSM - memcached session management integration
You can reference here for more detail information https://github.com/magro/memcached-session-manager/wiki/SetupAndConfiguration#example-for-sticky-sessions–kryo Here we have some changs / adjustments so that it could work with Magnolia CMS.
There are several session serialization strategies available, as they are described on SerializationStrategies. The default strategy uses java serialization and is already provided by the memcached-session-manager jar. Other strategies are provided by separate jars, in the section below you'll see which jars are required for which strategy.
Configure Tomcat
The configuration of tomcat requires two things: you need to drop some jars in your $CATALINA_HOME/lib/ and WEB-INF/lib/ directories and you have to configure the memcached session manager in the related <Context> element (e.g. in META-INF/context.xml inside the application files).
Add memcached-session-manager jars to tomcat
Independent of the chosen serialization strategy you always need the memcached-session-manager-${version}.jar and either memcached-session-manager-tc6-${version}.jar for tomcat6, memcached-session-manager-tc7-${version}.jar for tomcat7 (attention: tomcat 7.0.23+) or memcached-session-manager-tc8-${version}.jar for tomcat8.
If you're using memcached, you also need the spymemcached-2.11.1.jar.
If you're using couchbase, you need additionally these jars: couchbase-client-1.4.0.jarjettison-1.3.jar, commons-codec-1.5.jar, httpcore-4.3.jar, httpcore-nio-4.3.jar, netty-3.5.5.Final.jar.
If you're using Redis, you need the jedis-2.9.0.jar.
Please download the appropriate jars and put them in $CATALINA_HOME/lib/.
We have selected below jars for you as of September 2017 which are compatible with memcached-session-manager-2.1.1, Tomcat 8, Kryo suite and spymemcached-2.11.1 (download below)
Unzip it and copy them to your $CATALINA_HOME/lib folder and restart Tomcat to get it works. Which includes:
asm-5.0.4.jar

kryo-4.0.0.jar

kryo-serializers-0.41.jar

memcached-session-manager-2.1.1.jar

memcached-session-manager-tc8-2.1.1.jar

minlog-1.3.0.jar

msm-kryo-serializer-2.1.1.jar

objenesis-2.2.jar

reflectasm-1.11.3.jar

spymemcached-2.11.1.jar
Add custom serializers to your webapp (optional)
If you want to use java's built in serialization nothing more has to be done. If you want to use a custom serialization strategy (e.g. because of better performance) this has to be deployed with your webapp so that they're available in WEB-INF/lib/.
As msm is available in maven central (under groupId de.javakaffee.msm) you can just pull it in using the dependency management of your build system. With maven you can use this dependency definition for the kryo-serializer:
<dependency>
    <groupId>de.javakaffee.msm</groupId>
    <artifactId>msm-kryo-serializer</artifactId>
    <version>1.9.7</version>
    <scope>runtime</scope>
</dependency>
For javolution the artifactId is msm-javolution-serializer, for xstream msm-xstream-serializer and for flexjson it's msm-flexjson-serializer.
If you're not using a dependency management based on maven repositories these are the jars you need for the different serializers:
- kryo-serializer: msm-kryo-serializer, kryo-serializers-0.34+, kryo-3.x, minlog, reflectasm, asm-5.x, objenesis-2.x
- javolution-serializer: msm-javolution-serializer, javolution-5.4.3.1
- xstream-serializer: msm-xstream-serializer, xstream, xmlpull, xpp3_min
- flexjson-serializer: msm-flexjson-serializer, flexjson
Configure memcached-session-manager as <Context> Manager
Update the <Context> element (in META-INF/context.xml or what else you choose for context definition, please check the related tomcat documentation for this) so that it contains the Manager configuration for the memcached-session-manager, like in the examples below.
In this guideline as we are working with Magnolia CMS, let's do it in our Root context of tomcat server 1:
$ sudo vi $CATALINA_HOME/conf/context.xmlPut this above your closed tag </Context>
<Manager className="de.javakaffee.web.msm.MemcachedBackupSessionManager"

    memcachedNodes="n1:192.168.56.108:11211,n2:192.168.56.109:11211"

	sticky="true"

	sessionBackupAsync="true"

    storageKeyPrefix="static:mgnlctx"

    requestUriIgnorePattern=".*\.(ico|png|gif|jpg|css|js)$"

    transcoderFactoryClass="de.javakaffee.web.msm.serializer.kryo.KryoTranscoderFactory"

    />
Do it again on your tomcat server 2 with out any modification as we don't have any specific change for each of them.
Restart your tomcat instances and look into your logs to make sure that it's working as below:
$ sudo service tomcat restart
$ sudo tail -f $CATALINA_HOME/logs/catalina.out
Sample output:
Make sure that you can 'see' this line (of couse the timestamp should not be the same)
31-Aug-2017 09:10:36.056 INFO [main] org.apache.catalina.startup.Catalina.start Server startup in 25338 ms
Which indicates that your Tomcat instance was successfully started up without any obstacle.
Check point
Go to this location from your external computer to make sure that either your HAProxy or Sticky sessions are working
http://haproxy_www_public_IP:8888/probe/appsummary.htm?webapp=%2fprobe&size=

Deploy Magnolia CMS
Final step in this tutorial is to install Magnolia CMS to your Tomcat instances and make sure that it works correctly.
Here is Download link for Magnolia CMS 5.5.6 demo WAR file.
Please reference to our Release notes for Magnolia CORE 5.5.6 for more information.
Stop your tomcat instances, copy downloaded war file to $CATALINA_HOME/webapps, rename it to 'mgnl' or whatever name that you prefer, then start tomcat again with a closer look at our 'catalina.out' for changes and notifications.
Note that because of our caching and load balancing solution you will need to do this sequentially without cache and proxy (please disable them) to make sure that Magnolia CMS instances were successfully up and running for the first time. To do this, firstly please stop all your Memcached and Tomcat instances (sudo service stop memcached / tomcat), start your instance 1, go to its http://localhost:8080/mgnl/ link to install Magnolia CMS, start it up, enter your enterprise license (in case you are using our enterprise solution - probably yes, otherwise you will not dive into this guideline ![]() ) login to Superuser for the first time, configure its based location, and things that would affect your running instances. Then move on to another instances after stopping your previous one to make sure that they are not interfere with each other during setting up period.
) login to Superuser for the first time, configure its based location, and things that would affect your running instances. Then move on to another instances after stopping your previous one to make sure that they are not interfere with each other during setting up period.
Check point
After all your instances up and running, start your HAProxy service and go to its public IP, login and open our Travel demo page for a sanity test. Use this link:
http://haproxy_www_public_IP:8888/mgnl/.magnolia/admincentral#app:pages:detail;/travel:edit

Known issues and best practices
Known issues
Q1: Wrong configuration may cause this issue:
Q2: Cannot load MagnoliaProWidgetSet.
→ Increase kryo cache buffer size as below best practice #2 - set -Dmsm.kryo.bufferSize.max=204800000
Q3: java.io.NotSerializableException:
→ Use 3rd party serialization solution such as Kryo in this tutorial
Best practices
Use Magnolia CMS Memcached module in combination with our deployment, documentation here: https://documentation.magnolia-cms.com/display/DOCS/Memcached+implementation
Enable Memcached logger, increase msm-kryo max buffer size and increase Tomcat memory in '$CATALINA_HOME/bin/catalina.sh' as below
CATALINA_OPTS="$CATALINA_OPTS -Dnet.spy.log.LoggerImpl=net.spy.memcached.compat.log.SunLogger -Dmsm.kryo.bufferSize.max=204800000"
CATALINA_OPTS="$CATALINA_OPTS -Xms1600m -Xmx1600m"
Setting up Jackrabbit clustering (documentation here) for content sharing and to save publish efforts on less important big contents (LOBs)
Please follow Grégory Joseph recommendation in this document Re: Guide - How to install your perfect linux server for Magnolia
- don't add stuff to catalina.sh. env variables need to be set in setenv.sh; and even then, I'd recommend using magnolia_control.sh or something similar, to avoid those vars to be set ALSO when calling the shutdown program. (which IS an issue if you have jmx or debug options in there)
- likewise, I wouldn't recommend to set JAVA_HOME system-wide, but just in setenv.sh (more explicit, less magic, and you can use different java versions for different tomcats)
- you might want to double-check the scripts, there are lost \ in there.
Contact support@magnolia-cms.com for more detail and support, please note that we would prefer JIRA tickets on our SUPPORT project for proper SLA reaction rather than personal emails or accidentally ping on Skype or Facebook ![]()
TO BE CONTINUED!